axios
如何去封装 axios
面试官:Vue/React 项目中有封装过 axios 吗?怎么封装的?
一、什么是 axios,有什么特性
描述
axios 是一个基于promise的HTTP库,可以用在浏览器或者node.js中。本文围绕 XHR。
axios 提供两个 http 请求适配器,XHR 和 HTTP。XHR 的核心是浏览器端的 XMLHttpRequest 对象;HTTP 的核心是 node 的 http.request 方法。
特性:
- 从浏览器中创建 XMLHttpRequests
- 从 node.js 创建 http 请求
- 支持 promise API
- 拦截请求与响应
- 转换请求数据与响应数据
- 取消请求
- 自动转换 JSON 数据
- 客户端支持防御 XSRF
背景
自Vue2.0 起,尤大宣布取消对 vue-resource 的官方推荐,转而推荐 axios。现在 axios 已经成为大部分 Vue 开发者的首选,目前在 github 上有 87.3k star。axios的熟练使用和基本封装也成为了 vue 技术栈系列必不可少的一部分。如果你还不了解 axios,建议先熟悉 axios 官网文档。
基本使用
安装
npm install axios -S
使用
import axios from "axios";
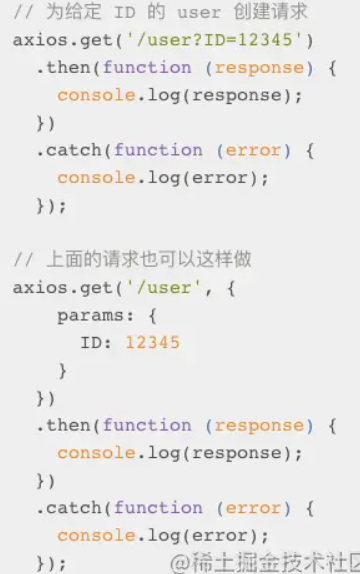
// 为给定ID的user创建请求
axios
.get("/user?ID=12345")
.then(function (response) {
console.log(response);
})
.catch(function (error) {
console.log(error);
});
// 上面的请求也可以这样做
axios
.get("/user", {
params: { ID: 12345 },
})
.then(function (response) {
console.log(response);
})
.catch(function (error) {
console.log(error);
});
二、Vue 项目中为什么要封装 axios
axios的 API 很友好,可以在项目中直接使用。但是在大型项目中,http 请求很多,且需要区分环境, 每个网络请求有相似需要处理的部分,如下,会导致代码冗余,破坏工程的可维护性,扩展性
axios("http://www.kaifa.com/data", {
  // 配置代码
  method: "GET",
  timeout: 3000,
  withCredentials: true,
  headers: {
    "Content-Type": "application/json",
  },
  // 其他请求配置...
}).then(
  (data) => {
    // todo: 真正业务逻辑代码
    console.log(data);
  },
  (err) => {
    // 错误处理代码
    if (err.response.status === 401) {
      // handle authorization error
    }
    if (err.response.status === 403) {
      // handle server forbidden error
    }
    // 其他错误处理.....
    console.log(err);
  }
);
环境区分
请求头信息
请求类型
请求超时时间
- timeout: 3000
允许携带 cookie
- withCredentials: true
响应结果处理
- 登录校验失败
- 无权限
- 成功
三、Vue 项目中如何封装 axios
axios 文件封装在目录src/utils/https.js,对外暴露callApi函数
1、环境区分
callApi函数暴露prefixUrl参数,用来配置 api url前缀,默认值为api
// src/utils/https.js
import axios from 'axios'

export const callApi = ({
  url,
  ...
  prefixUrl = 'api'
}) => {
  if (!url) {
    const error = new Error('请传入url')
    return Promise.reject(error)
  }
  const fullUrl = `/${prefixUrl}/${url}`

  ...

  return axios({
    url: fullUrl,
    ...
  })
}
看到这里大家可能会问,为什么不用 axios 提供的配置参数baseURL,原因是baseURL会给每个接口都加上对应前缀,而项目实际场景中,存在一个前端工程,对应多个服务的场景。需要通过不用的前缀代理到不同的服务,baseURL虽然能实现,但是需要二级前缀,不优雅,且在使用的时候看不到真实的 api 地址是啥,因为代理前缀跟真实地址混合在一起了
使用baseURL,效果如下
函数设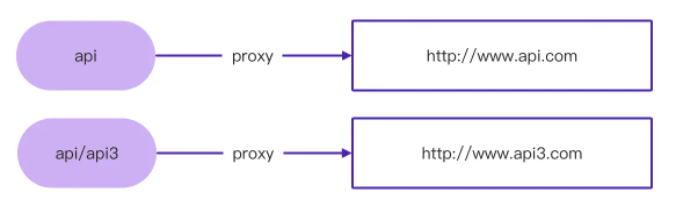 置 prefixUrl 参数,效果如下
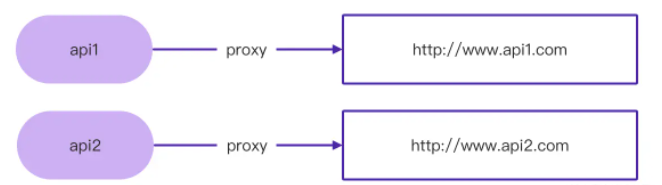
利用环境变量及webpack代理(这里用 vuecli3 配置)来作判断,用来区分开发、测试环境。生产环境同理配置nginx代理
// vue.config.js
const targetApi1 =
  process.env.NODE_ENV === "development"
    ? "http://www.kaifa1.com"
    : "http://www.ceshi1.com";

const targetApi2 =
  process.env.NODE_ENV === "development"
    ? "http://www.kaifa2.com"
    : "http://www.ceshi2.com";
module.exports = {
  devServer: {
    proxy: {
      "/api1": {
        target: targetApi1,
        changeOrigin: true,
        pathRewrite: {
          "/api1": "",
        },
      },
      "/api2": {
        target: targetApi2,
        changeOrigin: true,
        pathRewrite: {
          "/api2": "",
        },
      },
    },
  },
};
2、请求头
常见以下三种
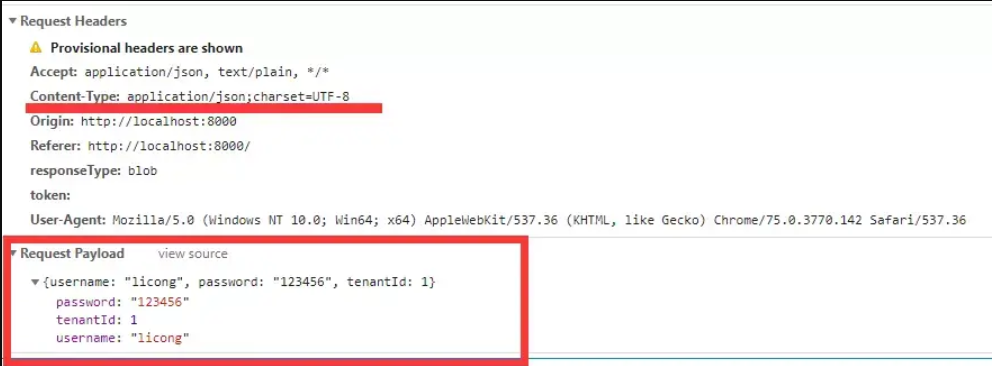
(1)application/json
参数会直接放在请求体中,以 JSON 格式的发送到后端。这也是 axios 请求的默认方式。这种类型使用最为广泛。
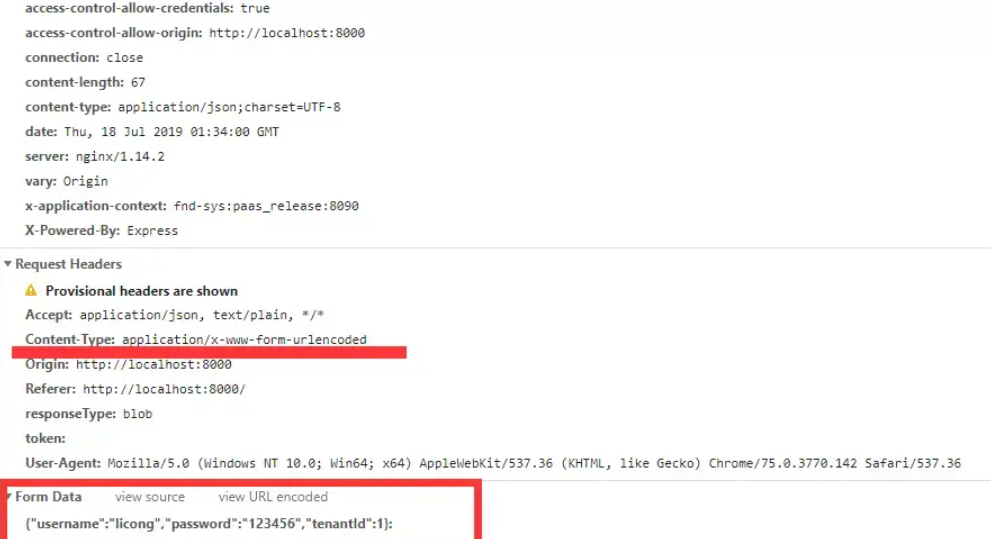
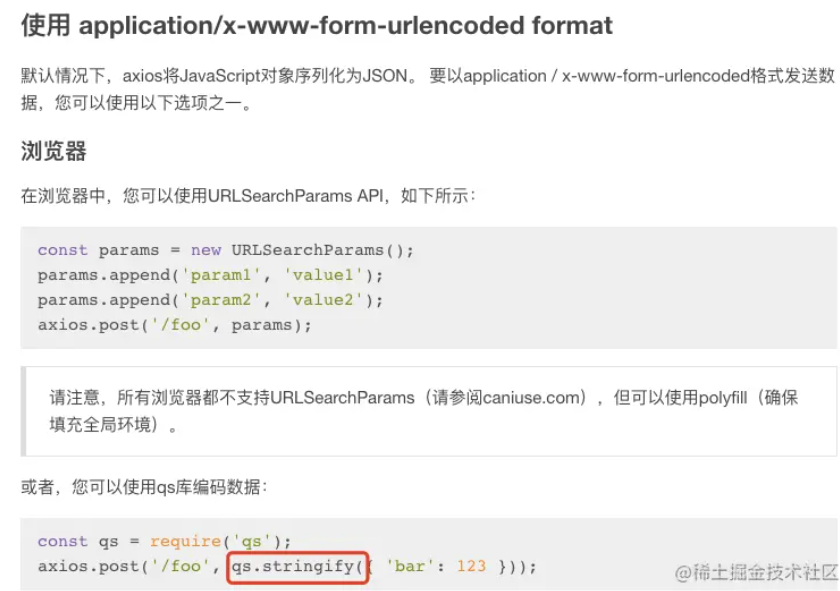
(2)application/x-www-form-urlencoded
请求体中的数据会以普通表单形式(键值对)发送到后端。
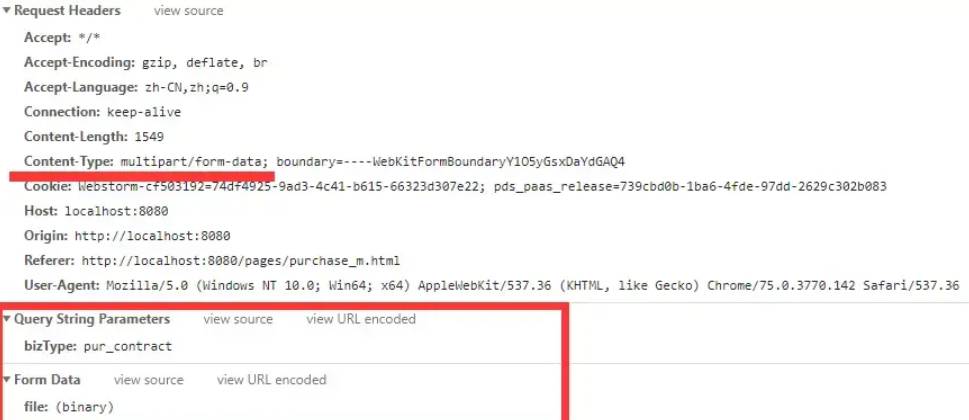
(3)multipart/form-data
参数会在请求体中,以标签为单元,用分隔符(可以自定义的 boundary)分开。既可以上传键值对,也可以上传文件。通常被用来上传文件的格式。
callApi函数暴露contentType参数,用来配置请求头,默认值为application/json; charset=utf-8
看到这里大家可以会疑惑,直接通过options配置headers不可以嘛,答案是可以的,可以看到newOptions的取值顺序,先取默认值,再取配置的options,最后取contentType,contentType能满足绝大部分场景,满足不了的场景下可用options配置
通过options配置headers,写 n 遍headers: {'Content-Type': 'application/x-www-form-urlencoded; charset=utf-8'};而通过contentType配置,传参json || urlencoded || multipart即可
当contentType === urlencoded时,qs.stringify(data)
// src/utils/https.js
import axios from 'axios'
import qs from 'qs'

const contentTypes = {
  json: 'application/json; charset=utf-8',
  urlencoded: 'application/x-www-form-urlencoded; charset=utf-8',
  multipart: 'multipart/form-data',
}

const defaultOptions = {
  headers: {
    Accept: 'application/json',
    'Content-Type': contentTypes.json,
  }
}

export const callApi = ({
  url,
  data = {},
  options = {},
  contentType = 'json', // json || urlencoded || multipart
  prefixUrl = 'api'
}) => {

  ...

  const newOptions = {
    ...defaultOptions,
    ...options,
    headers: {
      'Content-Type': options.headers && options.headers['Content-Type'] || contentTypes[contentType],
    },
  }

  const { method } = newOptions

  if (method !== 'get' && method !== 'head') {
    if (data instanceof FormData) {
      newOptions.data = data
      newOptions.headers = {
        'x-requested-with': 'XMLHttpRequest',
        'cache-control': 'no-cache',
      }
    } else if (options.headers['Content-Type'] === contentTypes.urlencoded) {
      newOptions.data = qs.stringify(data)
    } else {
      Object.keys(data).forEach((item) => {
        if (
          data[item] === null ||
          data[item] === undefined ||
          data[item] === ''
        ) {
          delete data[item]
        }
      })
      // 没有必要,因为axios会将JavaScript对象序列化为JSON
      // newOptions.data = JSON.stringify(data);
    }
  }

  return axios({
    url: fullUrl,
    ...newOptions,
  })
}
注意,在application/json格式下,JSON.stringify 处理传参没有意义,因为 axios 会将 JavaScript 对象序列化为 JSON,也就说无论你转不转化都是 JSON
3、请求类型
请求类型参数为axios的options的method字段,传入对应的请求类型如post、get等即可
不封装,使用原生axios时,发送带参数的get请求如下:
// src/service/index.js
import { callApi } from "@/utils/https";

export const delFile = (params) =>
  callApi({
    url: `file/delete?systemName=${params.systemName}&menuId=${params.menuId}&appSign=${params.appSign}`,
    option: {
      method: "get",
    },
  });

// 或者
export const delFile = (params) =>
  callApi({
    url: "file/delete",
    option: {
      method: "get",
      params,
    },
  });
官方文档如下
callApi函数暴露method参数,用来配置请求类型,默认值为get
当请求类型为get时,将callApi函数暴露的data参数,设置为options.params,从而参数自动拼接到 url 地址之后
// src/utils/https.js
import axios from 'axios'

export const callApi = ({
  url,
  data = {},
  method = 'get',
  options = {},
  ...
  prefixUrl = 'api'
}) => {
    ...
    const newOptions = {
        ...,
        ...options,
        method
    }
    ...
    if(method === 'get'){
        newOptions.params = data
    }
    ...

    return axios({
        url: fullUrl,
        ...newOptions,
    })
}
4、请求超时时间
// src/utils/https.js
const defaultOptions = {
  timeout: 15000,
};
5、允许携带 cookie
// src/utils/https.js
const defaultOptions = {
  withCredentials: true,
};
6、响应结果处理
通过.then、.catch()处理
这块需要跟服务端约定接口响应全局码,从而统一处理登录校验失败,无权限,成功等结果
比如有些服务端对于登录校验失败,无权限,成功等返回的响应码都是 200,在响应体内返回的状态码分别是 20001,20002,10000,在then()中处理
比如有些服务端对于登录校验失败,无权限,成功响应码返回 401,403,200,在catch()中处理
// src/utils/https.js
import axios from 'axios'
import { Message } from "element-ui";

export const callApi = ({
  ...
}) => {

 ...

 return axios({
    url: fullUrl,
    ...newOptions,
  })
    .then((response) => {
      const { data } = response
      if (data.code === 'xxx') {
        // 与服务端约定
        // 登录校验失败
      } else if (data.code === 'xxx') {
        // 与服务端约定
        // 无权限
        router.replace({ path: '/403' })
      } else if (data.code === 'xxx') {
        // 与服务端约定
        return Promise.resolve(data)
      } else {
        const { message } = data
        if (!errorMsgObj[message]) {
          errorMsgObj[message] = message
        }
        setTimeout(debounce(toastMsg, 1000, true), 1000)
        return Promise.reject(data)
      }
    })
    .catch((error) => {
      if (error.response) {
        const { data } = error.response
        const resCode = data.status
        const resMsg = data.message || '服务异常'
        // if (resCode === 401) { // 与服务端约定
        //     // 登录校验失败
        // } else if (data.code === 403) { // 与服务端约定
        //     // 无权限
        //     router.replace({ path: '/403' })
        // }
        if (!errorMsgObj[resMsg]) {
          errorMsgObj[resMsg] = resMsg
        }
        setTimeout(debounce(toastMsg, 1000, true), 1000)
        const err = { code: resCode, respMsg: resMsg }
        return Promise.reject(err)
      } else {
        const err = { type: 'canceled', respMsg: '数据请求超时' }
        return Promise.reject(err)
      }
    })
}
上述方案在Message.error(xx)时,当多个接口返回的错误信息一致时,会存在重复提示的问题,如下图
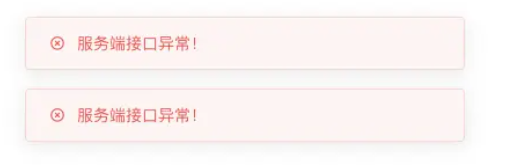
优化方案,利用防抖,实现错误提示一次,更优雅
四、完整封装及具体使用
代码可访问github
axios-ajax 完整封装
// src/utils/https.js
import axios from "axios";
import qs from "qs";
import { debounce } from "./debounce";

const contentTypes = {
  json: "application/json; charset=utf-8",
  urlencoded: "application/x-www-form-urlencoded; charset=utf-8",
  multipart: "multipart/form-data",
};

function toastMsg() {
  Object.keys(errorMsgObj).map((item) => {
    Message.error(item);
    delete errorMsgObj[item];
  });
}

let errorMsgObj = {};

const defaultOptions = {
  withCredentials: true, // 允许把cookie传递到后台
  headers: {
    Accept: "application/json",
    "Content-Type": contentTypes.json,
  },
  timeout: 15000,
};

export const callApi = ({
  url,
  data = {},
  method = "get",
  options = {},
  contentType = "json", // json || urlencoded || multipart
  prefixUrl = "api",
}) => {
  if (!url) {
    const error = new Error("请传入url");
    return Promise.reject(error);
  }
  const fullUrl = `/${prefixUrl}/${url}`;

  const newOptions = {
    ...defaultOptions,
    ...options,
    headers: {
      "Content-Type":
        (options.headers && options.headers["Content-Type"]) ||
        contentTypes[contentType],
    },
    method,
  };
  if (method === "get") {
    newOptions.params = data;
  }

  if (method !== "get" && method !== "head") {
    newOptions.data = data;
    if (data instanceof FormData) {
      newOptions.headers = {
        "x-requested-with": "XMLHttpRequest",
        "cache-control": "no-cache",
      };
    } else if (newOptions.headers["Content-Type"] === contentTypes.urlencoded) {
      newOptions.data = qs.stringify(data);
    } else {
      Object.keys(data).forEach((item) => {
        if (
          data[item] === null ||
          data[item] === undefined ||
          data[item] === ""
        ) {
          delete data[item];
        }
      });
      // 没有必要,因为axios会将JavaScript对象序列化为JSON
      // newOptions.data = JSON.stringify(data);
    }
  }

  axios.interceptors.request.use((request) => {
    // 移除起始部分 / 所有请求url走相对路径
    request.url = request.url.replace(/^\//, "");
    return request;
  });

  return axios({
    url: fullUrl,
    ...newOptions,
  })
    .then((response) => {
      const { data } = response;
      if (data.code === "xxx") {
        // 与服务端约定
        // 登录校验失败
      } else if (data.code === "xxx") {
        // 与服务端约定
        // 无权限
        router.replace({ path: "/403" });
      } else if (data.code === "xxx") {
        // 与服务端约定
        return Promise.resolve(data);
      } else {
        const { message } = data;
        if (!errorMsgObj[message]) {
          errorMsgObj[message] = message;
        }
        setTimeout(debounce(toastMsg, 1000, true), 1000);
        return Promise.reject(data);
      }
    })
    .catch((error) => {
      if (error.response) {
        const { data } = error.response;
        const resCode = data.status;
        const resMsg = data.message || "服务异常";
        // if (resCode === 401) { // 与服务端约定
        //     // 登录校验失败
        // } else if (data.code === 403) { // 与服务端约定
        //     // 无权限
        //     router.replace({ path: '/403' })
        // }
        if (!errorMsgObj[resMsg]) {
          errorMsgObj[resMsg] = resMsg;
        }
        setTimeout(debounce(toastMsg, 1000, true), 1000);
        const err = { code: resCode, respMsg: resMsg };
        return Promise.reject(err);
      } else {
        const err = { type: "canceled", respMsg: "数据请求超时" };
        return Promise.reject(err);
      }
    });
};
// src/utils/debounce.js
export const debounce = (func, timeout, immediate) => {
  let timer;

  return function () {
    let context = this;
    let args = arguments;

    if (timer) clearTimeout(timer);
    if (immediate) {
      var callNow = !timer;
      timer = setTimeout(() => {
        timer = null;
      }, timeout);
      if (callNow) func.apply(context, args);
    } else {
      timer = setTimeout(function () {
        func.apply(context, args);
      }, timeout);
    }
  };
};
具体使用
api 管理文件在目录src/service下,index.js文件暴露其他模块,其他文件按功能模块划分文件
get 请求带参数 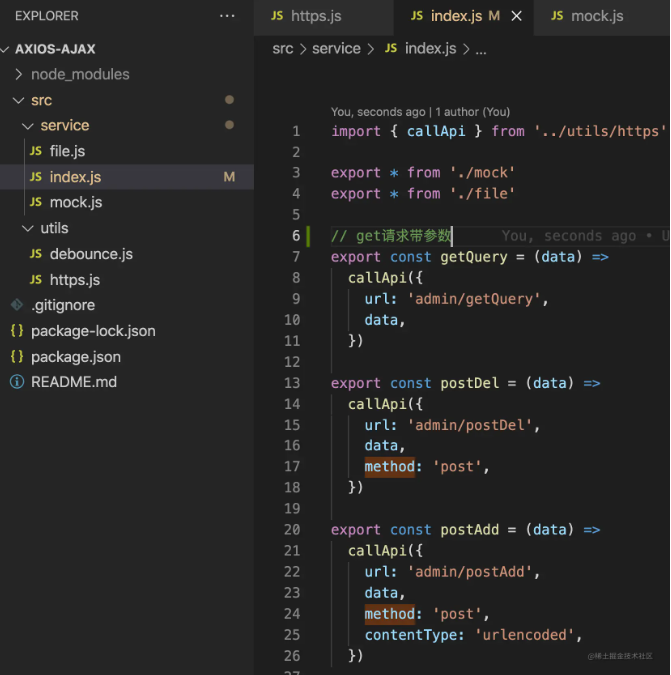 自定义前缀代理不同服务
  文件类型处理
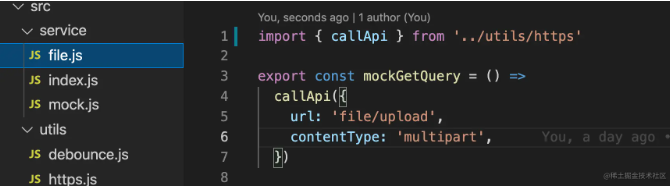
拦截器原理
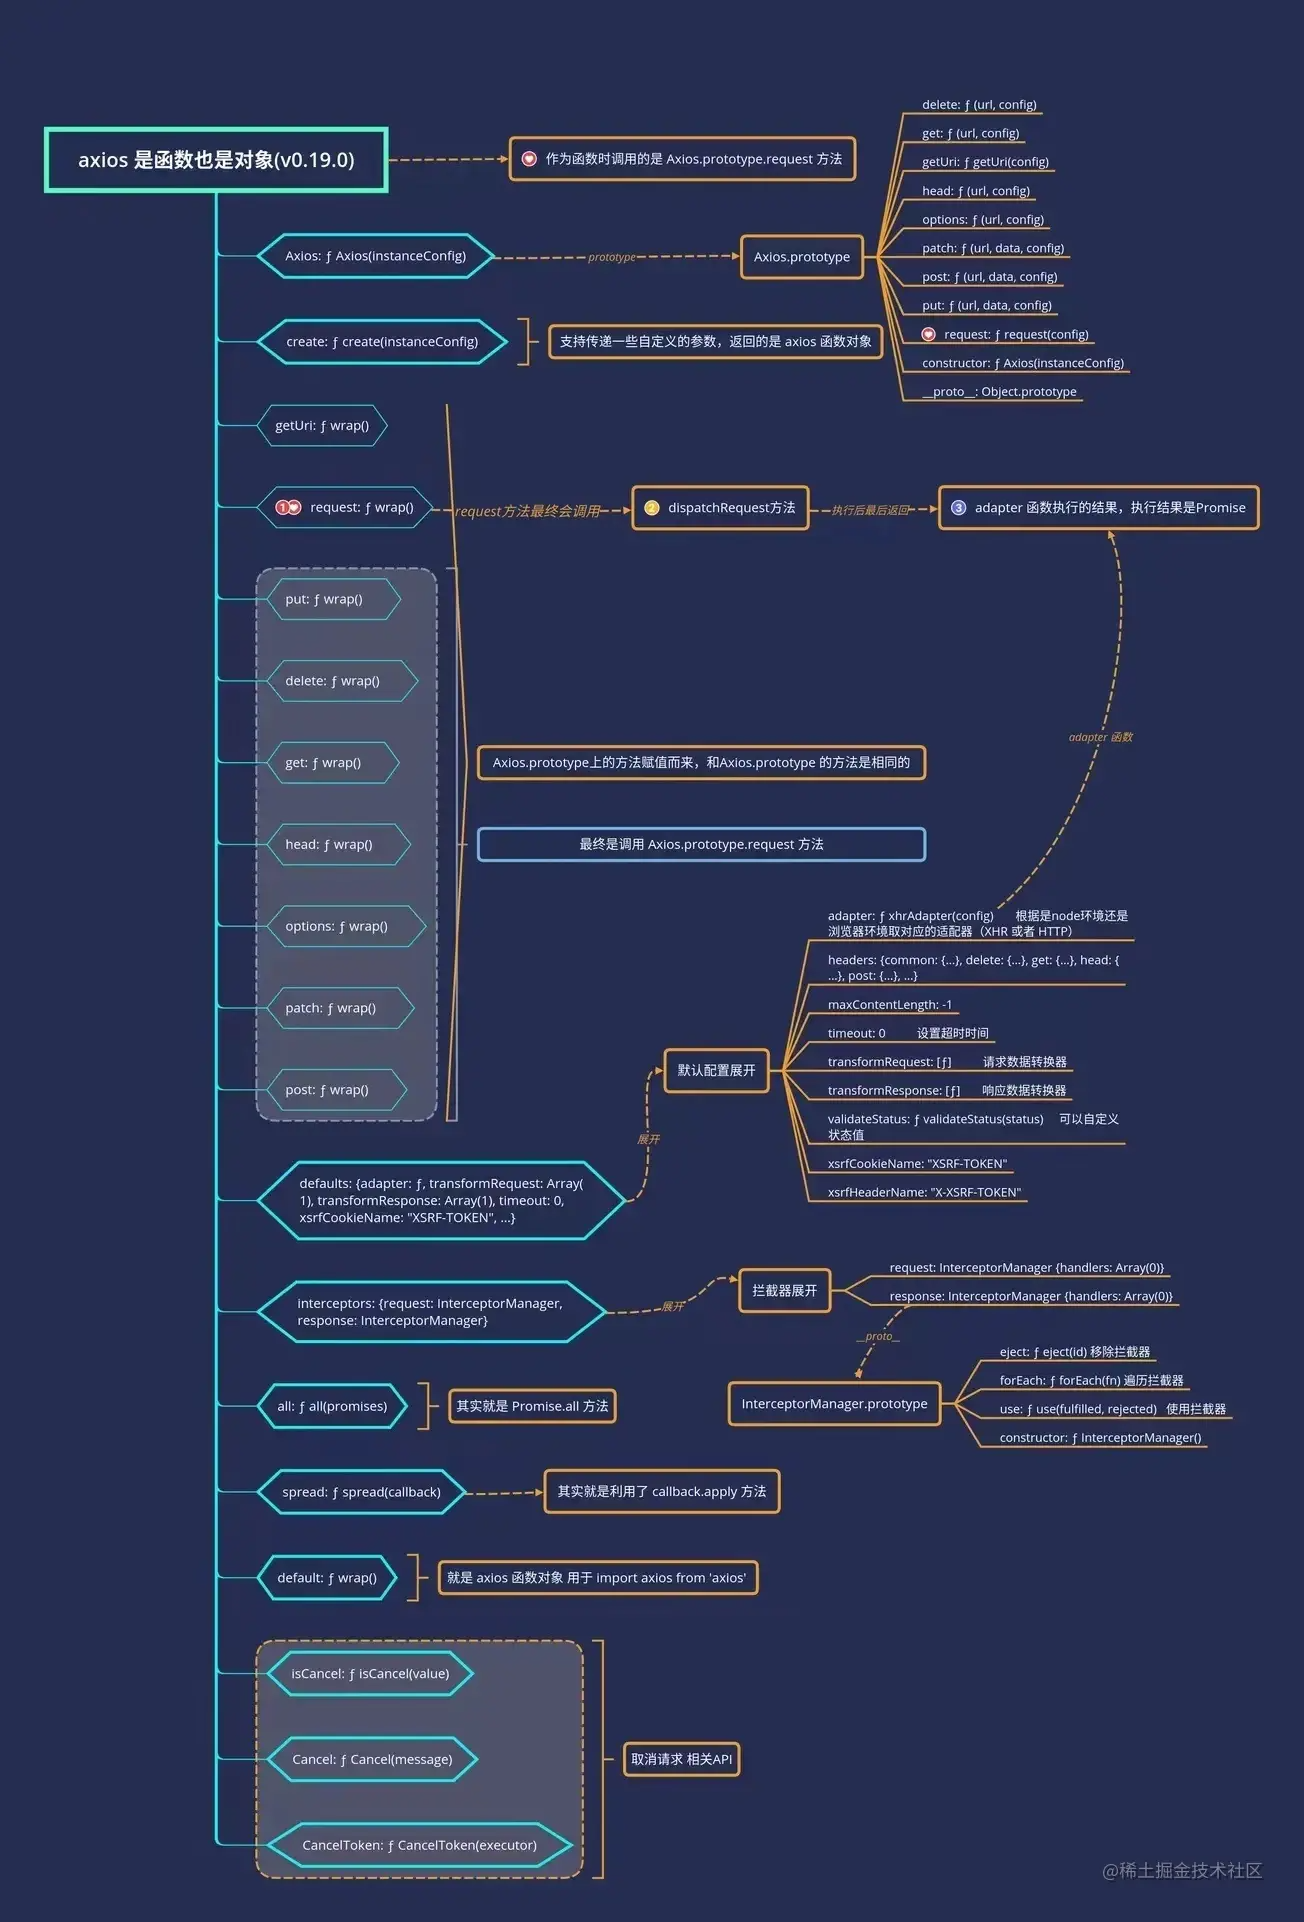
现在我们重新理一下, 请求拦截器发生在 api 请求之前, 响应拦截器发生在 api 请求之后,仔细思考 🤔 一下,其实它们本质上只是一个执行顺序的关系。 这其实就是一个数组 chain 能实现的,把请求拦截器的函数推到数组前面, api 请求放在中间, 响应拦截器放在数组后面,遍历执行数组 chain 就实现了拦截器的执行顺序关系,是不是很简单。

InterceptorManager 构造函数有 handlers 数组,保存所有的拦截函数, 并且在它的原型上添加三个方法, use用于添加拦截函数, 返回一个 id, eject用于取消拦截器, forEach 遍历所有拦截器。
// 拦截器构造函数
function InterceptorManager() {
  // 保存拦截器的数组,axios.interceptors.use的拦截函数会被push到handlers,可以添加多个拦截器
  this.handlers = [];
}

// 向拦截器原型上挂载 use方法, 向handler数组中push一个对象, 返回一个id
// 这样就可以通过eject(id) 取消拦截函数了。
InterceptorManager.prototype.use = function use(fulfilled, rejected, options) {
  this.handlers.push({
    fulfilled: fulfilled,
    rejected: rejected,
    synchronous: options ? options.synchronous : false,
    runWhen: options ? options.runWhen : null,
  });
  return this.handlers.length - 1;
};

// 移除拦截器
InterceptorManager.prototype.eject = function eject(id) {
  // 通过id可以查找对应的拦截器,进行移除
  if (this.handlers[id]) {
    this.handlers[id] = null;
  }
};

// 遍历执行所有拦截器
InterceptorManager.prototype.forEach = function forEach(fn) {
  utils.forEach(this.handlers, function forEachHandler(h) {
    if (h !== null) {
      fn(h);
    }
  });
};
请求拦截器和响应拦截器都是使用 new InterceptorManager 实现
function Axios(instanceConfig) {
  this.defaults = instanceConfig;
  // 请求拦截器和响应拦截器使用的都是 InterceptorManager构造函数
  this.interceptors = {
    request: new InterceptorManager(),
    response: new InterceptorManager(),
  };
}
任务编排, 重点来了(敲黑板), 通过 把 requestInterceptorChain 放在 chain 数组的前面,responseInterceptorChain 放在 chain 的后面,然后遍历执行 chain(chain 数组里的数据是成对出现的,一个是拦截器成功和拦截失败的函数,[dispatchRequest, undefined]中的 undefined 只起一个占位的作用 )。 达到 请求拦截器 -> api 请求 -> 响应拦截器 执行顺序的目的。
...
// dispatchRequest是api请求
var chain = [dispatchRequest, undefined];
// 把请求拦截器数组requestInterceptorChain 放在 chain 数组的前面
Array.prototype.unshift.apply(chain, requestInterceptorChain);

// 把响应拦截器responseInterceptorChain 放在chain数组的后面
chain = chain.concat(responseInterceptorChain);

promise = Promise.resolve(config);
// 遍历执行chain函数
while (chain.length) {
  promise = promise.then(chain.shift(), chain.shift());
}
cancel token
基本使用
使用 CancelToken.souce 工厂方法创建一个 cancel token,代码如下:
axios 为我们提供了一个 isCancel() 方法,用于判断请求的中止状态。isCancel() 方法的参数,就是我们在中止请求时自定义的信息
const CancelToken = axios.CancelToken;
const source = CancelToken.source();

axios
  .get("https://mdn.github.io/dom-examples/abort-api/sintel.mp4", {
    cancelToken: source.token,
  })
  .catch(function (thrown) {
    // 判断请求是否已中止
    if (axios.isCancel(thrown)) {
      // 参数 thrown 是自定义的信息
      console.log("Request canceled", thrown.message);
    } else {
      // 处理错误
    }
  });

// 取消请求(message 参数是可选的)
source.cancel("Operation canceled by the user.");
通过传递一个 executor 函数到 CancelToken 的构造函数来创建一个 cancel token:
const CancelToken = axios.CancelToken;
let cancel;

axios.get("/user/12345", {
  cancelToken: new CancelToken(function executor(c) {
    // executor 函数接收一个 cancel 函数作为参数
    cancel = c;
  }),
});

// 取消请求
cancel("Operation canceled by the user.");
在项目中切换路由,停止原路由中的正在请求的接口
在我参与的项目中有的页面在进入时会调用多个接口,并且这些接口可能会几秒后才请求完;在用户切换路由时这些接口就没有必要再请求了;
如果需求只是要在切换路由是取消之前的全部接口,使用下面的方法就可以实现;如果还有取消具体的某一个接口的需求,那么请看业务场景 2 的实现方式;
// 使用 CancelToken.source
// CancelToken.source 方法会构建一个 CancelToken 对象,并返回一个有两个参数的对象( token、cancel )
// token -> 构建出的 CancelToken 对象
// cancel -> 取消请求需要调用的方法
// 由于 CancelToken 对象是在拦截器外构建的,所有的接口中的 config.cancelToken 指向的都是同一个 CancelToken 对象,所以可以使用 source.cancel 方法取消所有的接口
import $store from "../store/index"; // 引入 store

let CancelToken = axios.CancelToken;
let source = CancelToken.source();

// 添加请求拦截器
axios.interceptors.request.use(
  function (config) {
    config.cancelToken = source.token;

    // 此处使用 store 存储取消接口的方法,便于在其他地方调用
    let arr = $store.getters.getCancelTokenList;
    arr.push(source.cancel);
    $store.commit("setCancelTokenList", arr);

    // 我见过有人在 main.js 中直接声明变量( Vue.prototype.$sourceCancel = null ) ,拦截器中进行赋值,再在需要的地方调用
    // 不知道这种方法的好处或者坏处,如果有人了解,欢迎评论
    // $sourceCancel = source.cancel
    return config;
  },
  function (error) {
    // 预处理请求有异常(error)时抛出错误
    return Promise.reject(error);
  }
);
// router.js
// 在路由守卫中设置切换路由后取消接口,并将存储方法的变量清空
router.beforeEach((to, from, next) => {
  console.log(this.$store.getters.getCancelTokenList[0]);
  this.$store.getters.getCancelTokenList[0]("取消接口");
  $store.commit("setCancelTokenList", []);
  next();
});
多次调用同一个接口时,需要取最新的接口返回信息
实现思路:取消接口的方法与场景 1 中的大致相同,但是由于需要对具体的某个接口进行取消,所以需要修改一下存储取消接口方法的变量,如下:
// 使用请求的 url 地址作为变量的 key 存储取消接口的方法
CancelTokenList = {
  url: function () {},
};

import $store from "../store/index"; // 引入 store
let CancelToken = axios.CancelToken;
let cancel = null;

// 方法1 - 使用 CancelToken.source
// 添加请求拦截器
axios.interceptors.request.use(
  function (config) {
    // 将 CancelToken 对象的构建放在拦截器里面,就不会出现多个取消方法指向同一个对象
    let source = CancelToken.source();
    let obj = $store.getters.getCancelTokenList;
    let url = config.url;

    config.cancelToken = source.token;
    if (config.method === "get") {
      url = url.split("?")[0];
    }
    if (obj[url]) {
      // 在存储的对象中有当前 url 的变量,则调用方法取消请求
      obj[url]("取消接口");
      delete obj[url];
    }
    obj[url] = source.cancel;
    $store.commit("setCancelTokenList", obj);
    return config;
  },
  function (error) {
    // 预处理请求有异常(error)时抛出错误
    return Promise.reject(error);
  }
);

// 方法2 - 直接使用 CancelToken 的构造函数
// 添加请求拦截器
axios.interceptors.request.use(
  function (config) {
    let url = config.url;
    let obj = $store.getters.getCancelTokenList;
    if (config.method === "get") {
      url = url.split("?")[0];
    }
    if (obj[url]) {
      // 在存储的对象中有当前 url 的变量,则调用方法取消请求
      obj[url]("取消接口");
      delete obj[url];
    }
    config.cancelToken = new CancelToken(function executor(c) {
      // executor 函数接收一个 cancel 函数作为参数
      cancel = c;
    });
    obj[url] = cancel;
    $store.commit("setCancelTokenList", obj);
    return config;
  },
  function (error) {
    // 预处理请求有异常(error)时抛出错误
    return Promise.reject(error);
  }
);
// router.js
// 使用 url 作为 key 的方式存储取消方法的话在路由守卫中就需要进行一次遍历
router.beforeEach((to, from, next) => {
  let obj = this.$store.getters.getCancelTokenList;
  for (let key in obj) {
    obj[key]("取消接口");
  }
  $store.commit("setCancelTokenList", []);
  next();
});
axios 源码分析
axios 是什么?
axios 是一个基于 promise 的 HTTP 库,可以用在浏览器和 node.js 中。
- 从浏览器中创建 XMLHttpRequest
- 从 node.js 中创建 http 请求
- 支持 Promise API
- 拦截请求和响应
- 转换请求数据和响应数据
- 取消请求
- 自动转换 JSON 数据
- 客户端支持防御 XSRF
axios 为什么可以使用 axios({ }) 和 axios.get()两种方式发送请求
axios 响应拦截器是如何实现的
axios 如何实现
如何使用 axios 避免 XSRF 攻击
创建实例
1.axios 为什么可以使用 axios({ }) 和 axios.get()两种方式发送请求
创建 axios 实例,也是我们通过 import axios from 'axios' 时的 axios 对象,这个对象实际上是 Axios 类的原型上的 request 方法, 方法中的 this 指向 一个新的基于默认配置创建的 axios 实例。
/**
 * @param {Object} defaultConfig 默认配置
 * @return {Axios} 一个 axios 的实例对象
 */
function createInstance(defaultConfig) {
  // 基于默认配置创建一个Axios实例上下文。
  var context = new Axios(defaultConfig);

  // bind方法返回一个函数,执行这个函数,相当于执行 Axios.prototype.request,方法中的 this 指向 context,
  // 这就是我们引入 axios 后可以直接通过 axios({...}) 发送请求的原因,
  var instance = bind(Axios.prototype.request, context);

  // 将 axios 的原型对象 Axios.prototype 上的属性依次赋值给这个实例对象
  // 这样操作后我们就可以通过 axios.get()发送请求,实际上调用原型对象上的方法
  utils.extend(instance, Axios.prototype, context);

  // 将 axios 实例的私有属性赋值给当前的 instance
  // 这样我们可以获取到实例上的属性,例如 通过 axios.defaultConfig 获取默认配置
  utils.extend(instance, context);
  return instance;
}

// 创建一个 axios 实例,实际上就是上述函数中的 instance;
var axios = createInstance(defaults);

module.exports.default = axios;
暴露的 axios 上挂载了基于默认配置创建的 Axios 实例属性,也挂载了原型上的方法。这里就解答了一个问题,使用 axios(config) 发送请求调用的是 Axios.prototype.request 方法,使用 axios.get(url[, config] )方法发送请求,调用的是 Axios.prototype.get 方法。
Axios 构造函数
/**
 * Create a new instance of Axios
 * @param {Object} instanceConfig 默认配置
 */
function Axios(instanceConfig) {
  this.defaults = instanceConfig;
  this.interceptors = {
    request: new InterceptorManager(),
    response: new InterceptorManager(),
  };
}

Axios.prototype.request = function request() {};
发送请求的 request 方法
- 获取发送 HTTP 请求的参数
- 编排请求的 Promise 链,并执行该 Promise 链
拦截器
在开发中经常会遇到需要在请求头中添加 token 字段用于登录身份验证,针对不同的请求方法做不同的处理,或者是对响应做统一的错误处理,例如统一报错处理。
所以 axios 提供了请求拦截器和响应拦截器,分别处理请求和响应,它们的作用如下:
- 请求拦截器:该类拦截器的作用是在请求发送前统一执行某些操作,比如在请求头中添加 token 字段。
- 响应拦截器:该类拦截器的作用是在接收到服务器响应后统一执行某些操作,比如发现响应状态码为 401 时,自动跳转到登录页。
// 添加请求拦截器
axios.interceptors.request.use(function (config) {
  // 在发送请求之前做些什么
  return config;
});
// 添加响应拦截器
axios.interceptors.response.use(function (response) {
  // 对响应数据做点什么
  return response;
});
请求相应拦截器本质上都是实现特定功能的函数,类似于 webpack 的 loader, 上一个函数的执行结果作为下一个函数的参数处理,执行顺序如下
请求拦截器 -> 分发 http 请求 -> 响应拦截器
要实现这个过程,我们首先需要注册请求拦截器和响应拦截器,然后 axios 会按照顺序给我们注册的函数排序,最后会依次执行排好序的函数
注册请求拦截器和相应拦截器
Axios 的构造函数
function Axios(instanceConfig) {
  this.defaults = instanceConfig;
  this.interceptors = {
    request: new InterceptorManager(),
    response: new InterceptorManager(),
  };
}
axios 上挂载了 axios 类的一个实例,这个实例有一个 interceptors 属性,属性值是一个对象,包含 request 和 response 两个属性,分别是用来注册和管理 请求拦截器和相应拦截器。我们来看一下是如何进行管理的
// 拦截器的构造函数
function InterceptorManager() {
  this.handlers = [];
}

// 注册拦截器函数,注意:这里拦截器可以注册多个, 按照注册的先后顺序排列
InterceptorManager.prototype.use = function use(fulfilled, rejected) {
  this.handlers.push({ fulfilled: fulfilled, rejected: rejected });
  return this.handlers.length - 1;
};

// 用于移除拦截器
InterceptorManager.prototype.eject = function eject(id) {
  if (this.handlers[id]) {
    this.handlers[id] = null;
  }
};
可以看到当我们调用 axios.interceptors.request.use(fulfilled, rejected),就成功注册了一个请求拦截器。注意,后注册的请求拦截器会先执行,响应拦截器是按照注册顺序执行的
如何给拦截器排序,让他们能按照我们预想的顺序执行
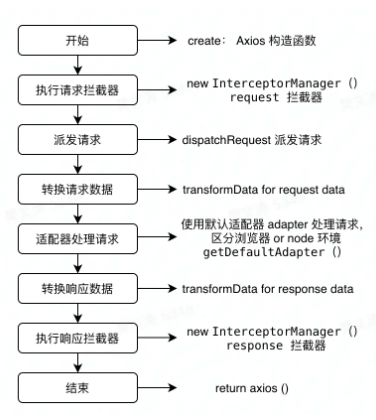
在 axios.prototype.request 完成参数的处理和合并之后,接下来就是执行请求拦截器 => 发送 HTTP 请求 => 执行响应拦截器
var chain = [dispatchRequest, undefined];
var promise = Promise.resolve(config);

this.interceptors.request.forEach(function unshiftRequestInterceptors(
  interceptor
) {
  chain.unshift(interceptor.fulfilled, interceptor.rejected);
});

this.interceptors.response.forEach(function pushResponseInterceptors(
  interceptor
) {
  chain.push(interceptor.fulfilled, interceptor.rejected);
});
首先是声明了分发 HTTP 请求的数组,接下来声明了一个 resolve 状态的 Promise,然后依次取出请求拦截器,放在数组的头部,响应拦截器放在数组的尾部。就组成了这样一个链条:
[request.fullfilled, request.rejected, ..., dispatchRequest, null, ..., response.fullfileed, response.rejected]
执行请求响应拦截器
当我们排好顺序之后,接下来就是按照顺序执行。我们来看下是如何执行的
while (chain.length) {
  promise = promise.then(chain.shift(), chain.shift());
}

return promise;
chain 是一个数组,只要 length 不为 0,就会一直执行,直到最后一个响应拦截器执行完,返回的还是一个 promise,这里需要注意,我们的自定义请求和响应拦截器一定要有返回值,否则请求结束后,我们无法获取最后的结果。
通过响应拦截器我们很方便在各个阶段执行自定义的行为。
发送请求
这个阶段需要关注的点是 axios 会根据环境的不同调用不同的请求处理函数,
如果是浏览器环境,会基于 XMLHttpRequest 创建,
如果是 node 环境下,会基于 HTTP 模块创建。
这里涉及到一个设计模式,适配器模式,用来解决已有接口之间不匹配的问题。 dispatchRequest 的执行流程:
config.header → transformRequestData → adapter → transformResponseData
在 adapter 中,除了发送 HTTP 请求之外,还有了一些有意思的处理,接下来我们就来看两个点:
1.可以通过 cancel token (abort 函数)来取消请求
2.可以设置 XSRF-TOKEN 来避免 CSRF 攻击
使用 cancel token 取消请求
如何取消请求?想象一个场景,当我们正在上传文件的时候,突然切换了页面,那么上一页面的上传请求就应该被取消掉,或者我们在进行接口轮询时,有可能上次的请求还在,在进行下一次请求之前应该取消掉上次的请求,这时候就可以用 cancel token 取消请求
import axios from "axios";
const CancelToken = axios.CancelToken;
/**
 * 文件上传方法
 * @param url
 * @param file
 * @param config
 * @returns {AxiosPromise<any>}
 */
export default function uploadFile(url, file, config = {}) {
  const source = CancelToken.source();
  const axiosConfig = Object.assign({ cancelToken: source.token }, config);
  const formData = new FormData();
  formData.append("file", file);
  const instance = axios.create();
  const request = instance.post(url, formData, axiosConfig);
  request.cancel = source.cancel;
  return request;
}
然后把 request 保存在 viewData 中,方法返回成功就把 request.cancel 置为 null,在页面销毁的时候,判断 request.cancel 的值,存在就执行 request.cancel 取消请求。
cancel token 是如何实现的
我们先看下 axios.CancelToken.source 是什么
axios.CancelToken = require("./cancel/CancelToken");
接下来就进入到 CancelToken 的文件夹中看看
/**
 * @class 构造函数 CancelToken
 * @param {Function} executor The executor function.
 */
function CancelToken(executor) {
  if (typeof executor !== "function") {
    throw new TypeError("executor must be a function.");
  }

  var resolvePromise;
  this.promise = new Promise(function promiseExecutor(resolve) {
    resolvePromise = resolve;
  });

  var token = this;
  executor(function cancel(message) {
    if (token.reason) {
      // Cancellation has already been requested
      return;
    }

    // 这里的 reason 是一个对象,对象有一个 message 属性,是一个字符串
    token.reason = new Cancel(message);
    resolvePromise(token.reason);
  });
}

// 上面我们例子中的 axios.CancelToken.source
CancelToken.source = function source() {
  var cancel;
  var token = new CancelToken(function executor(c) {
    cancel = c;
  });
  return {
    token: token,
    cancel: cancel,
  };
};

module.exports = CancelToken;
axios.CancelToken.source 是一个对象,这个对象有两个属性,分别是 token 和 cancel,token 的作用是提供一个 Promise,cancel 用于中断请求。 token 需要传递到 config 里,当 cancel 函数被执行时,token 的状态由 Pending 变为 Resolve
function cancel(message) {
  if (token.reason) {
    // Cancellation has already been requested
    return;
  }

  // 这里的 reason 是一个对象,对象有一个 message 属性,是一个字符串
  token.reason = new Cancel(message);

  // 这里的 resolvePromise 就是用来将取消请求的Promise状态由pending置为resolve
  resolvePromise(token.reason);
}
看完了 CancelToken 的实现,我们再去看一下它是如何中断请求的
在 xhr.js 中有一段关键性代码,如下:
module.exports = function xhrAdapter(config) {
  return new Promise(function dispatchXhrRequest(resolve, reject) {
    // Handle browser request cancellation (as opposed to a manual cancellation)
    request.onabort = function handleAbort() {
      if (!request) {
        return;
      }
      reject(createError("Request aborted", config, "ECONNABORTED", request));

      // Clean up request
      request = null;
    };

    if (config.cancelToken) {
      // 这里的config.cancelToken.promise就是我们之前说的pending状态的promise,
      config.cancelToken.promise.then(function onCanceled(cancel) {
        if (!request) {
          return;
        }

        request.abort();
        reject(cancel);
        // Clean up request
        request = null;
      });
    }
  });
};
当我们执行 axios.cancelToken.source.cancel('取消请求') 的时候,就会将 pending 状态的 Promise 置为 resolve 状态,会接着执行.then 后面的回调函数,即执行 request.abort()终止请求。接着会执行 request.onabort 注册的函数,将 xhrAdapter 中的 request Promise 状态置为 reject,我们就可以在 catch 中捕获到错误。
CSRF 攻击
跨站请求伪造(Cross-site request forgery),简单地说,是攻击者通过一些技术手段欺骗用户的浏览器去访问一个自己曾经认证过的网站并运行一些操作(如发邮件,发消息,甚至财产操作如转账和购买商品)。由于浏览器曾经认证过,所以被访问的网站会认为是真正的用户操作而去运行。
之前大家应该都都类似的经历,点击一个链接密码就被盗了
发生 csrf 的条件有三个,满足这三个条件,就会发生 CSRF 攻击
第一个,目标站点一定要有 CSRF 漏洞;
第二个,用户要登录过目标站点,并且在浏览器上保持有该站点的登录状态;
第三个,需要用户打开一个第三方站点
当用户在一个网站登陆时,比如说是一个论坛,点击一张图片,src 实际上是一个 http 请求地址(script src, 或者 img src 等都不受同源策略限制)
这样就向服务器发送了类似转账或者修改密码的请求,如果该服务器存在漏洞,就会发生 CSRF 攻击。
那么如何避免让服务器避免遭受到 CSRF 攻击呢
- 充分利用好 Cookie 的 SameSite 属性,SameSite 选项通常有 Strict、Lax 和 None 三个值。
- 验证请求的来源站点
- CSRF Token,这个也是 axios 防止 CSRF 攻击的使用方式
Axios 提供了 xsrfCookieName 和 xsrfHeaderName 两个属性来分别设置 CSRF 的 Cookie 名称和 HTTP 请求头的名称,它们的默认值如下所示
// lib/defaults.js
var defaults = {
  adapter: getDefaultAdapter(),
  xsrfCookieName: "XSRF-TOKEN",
  xsrfHeaderName: "X-XSRF-TOKEN",
};
Axios 如何防御 CSRF 攻击
// lib/adapters/xhr.js
module.exports = function xhrAdapter(config) {
  return new Promise(function dispatchXhrRequest(resolve, reject) {
    var requestHeaders = config.headers;
    var request = new XMLHttpRequest();
    // 添加xsrf头部
    if (utils.isStandardBrowserEnv()) {
      var xsrfValue =
        (config.withCredentials || isURLSameOrigin(fullPath)) &&
        config.xsrfCookieName
          ? cookies.read(config.xsrfCookieName)
          : undefined;
      if (xsrfValue) {
        requestHeaders[config.xsrfHeaderName] = xsrfValue;
      }
    }
    request.send(requestData);
  });
};
看完以上代码,我们知道了 Axios 是将 token 设置在 Cookie 中,在提交(POST、PUT、PATCH、DELETE)等请求时提交 Cookie,并通过请求头或请求体带上 Cookie 中已设置的 token,服务端接收到请求后,再进行对比校验
axios 源码模块分析
前言
说到 JS HTTP 请求,就不得不提 Axios,作为前端网络请求库领域中的霸主,被广泛应用于众多的 web 项目中。
几款热门 HTTP 请求库在 GitHub 上的受欢迎程度
| 热门 JS HTTP 请求库 | 特性简介 | Star | Fork |
|---|---|---|---|
| Axios | 基于 Promise,支持浏览器和 node | 85.4k | 8.3k |
| Request | 不基于 Promise,简化版的 HTTP | 25.2k | 3.1k |
| Fetch | 基于 Promise,不支持 node 调用 | 24.8k | 3k |
| Superagent | 15.7k | 1.3k |
虽然大家都是对 XMLHttpRequest 的封装,但是纵观 Axios 的热度,一骑绝尘啊!由此可见,Axios 真的是一个很优秀的开源项目。然而惭愧的是日常开发中总是拿来就用,一直没有静下心来好好拜读一番 Axios 的源码,会不会有很多人跟我一样呢?这里先列举一下 axios 项目的核心目录结构:
lib

└─ adapters

   ├─ http.js // node 环境下利用 http 模块发起请求

   ├─ xhr.js // 浏览器环境下利用 xhr 发起请求

└─ cancel

   ├─ Cancel.js

   ├─ CancelToken.js

   ├─ isCancel.js

└─ core

    ├─ Axios.js // 生成 Axios 实例

    ├─ InterceptorManager.js // 拦截器

    ├─ dispatchRequest.js  // 调用适配器发起请求

    ...

└─ helpers

    ├─ mergeConfig.js // 合并配置

    ├─ ...

├─ axios.js  // 入口文件

├─ defaults.js  // axios 默认配置项

├─ utils.js
简介
Axios 是一个基于 Promise 网络请求库,作用于 node.js 和浏览器中。在服务端它使用原生 node.jshttp模块, 而在客户端 (浏览端) 则使用 XMLHttpRequests。特性:
从浏览器创建XMLHttpRequests
从 node.js 创建http请求
支持PromiseAPI
拦截请求和响应
转换请求和响应数据
取消请求
自动转换 JSON 数据
客户端支持防御XSRF
Axios 内部运作流程
接下来我们结合 axios 的运作流程一起来剖析以下几个模块:
- Axios 构造函数
- 请求 / 响应拦截器
- dispatchRequest 派发请求
- 转换请求 / 响应数据
- 适配器处理 HTTP 请求
Axios 如何支持不同的使用方式?
使用 axios 发起请求
我们先来回忆一下平时是如何使用 axios 的:
// 方式 1  axios(config)

axios({

    method: 'get',

    url: 'xxx',

    data: {}

});


// 方式 2  axios(url[, config]),默认 get 请求

axios('http://xxx');


// 方式 3 使用别名进行请求

axios.request(config)

axios.get(url[, config])

axios.post(url[, data[, config]])

axios.put(url[, data[, config]])

...


// 方式 4 创建 axios 实例,自定义配置

const instance = axios.create({

  baseURL: 'https://some-domain.com/api/',

  timeout: 1000,

  headers: {'X-Custom-Header': 'foobar'}

});


axios#request(config)

axios#get(url[, config])

axios#post(url[, data[, config]])

axios#put(url[, data[, config]])

...
源码分析
首先来看 axios 的入口文件, lib 目录下的axios.js:
// /lib/axios.js

function createInstance(defaultConfig) {

  // 创建 axios 实例

  var context = new Axios(defaultConfig);

  // 把 instance 指向 Axios.prototype.request 方法

  var instance = bind(Axios.prototype.request, context);

  // 把 Axios.prototype 上的方法扩展到 instance 上,指定上下文是 context

  utils.extend(instance, Axios.prototype, context);

  // 把 context 上的方法扩展到 instance 上

  utils.extend(instance, context);

  // 导出 instance 对象

  return instance;

}

var axios = createInstance(defaults);

// 添加 create 方法,返回 createInstance 函数,参数为自定义配置 + 默认配置

axios.create = function create(instanceConfig) {

  return createInstance(mergeConfig(axios.defaults, instanceConfig));

};


...


module.exports = axios;

// Allow use of default import syntax in TypeScript

module.exports.default = axios;
可见,当我们调用axios()时,实际上是执行了createInstance返回的一个指向Axios.prototype.request的函数;
通过添加create方法支持用户自定义配置创建,并且最终也是执行了Axios.prototype.request方法;
接下来我们看看Axios.prototype.request的源码是怎么写的:
// /lib/core/Axios.js

// 创建一个 Axios 实例

function Axios(instanceConfig) {

  ...

}

Axios.prototype.request = function request(config) {

  // 判断 config 类型并赋值

  // 方式二:axios('https://xxxx') ,判断参数字符串,则赋值给 config.url

  if (typeof config === 'string') {

    config = arguments[1] || {};

    config.url = arguments[0];

  } else {

  // 方式一:axios({}) ,参数为对象,则直接赋值给 config

    config = config || {};

  }

  ...

}

...

// 方式三 & 方式四

// 遍历为请求设置别名

utils.forEach(['delete', 'get', 'head', 'options'], function forEachMethodNoData(method) {

  /*eslint func-names:0*/

  Axios.prototype[method] = function(url, config) {

    return this.request(mergeConfig(config || {}, {

      method: method,

      url: url,

      data: (config || {}).data

    }));

  };

});

// 遍历为请求设置别名

utils.forEach(['post', 'put', 'patch'], function forEachMethodWithData(method) {

  /*eslint func-names:0*/

  Axios.prototype[method] = function(url, data, config) {

    return this.request(mergeConfig(config || {}, {

      method: method,

      url: url,

      data: data

    }));

  };

});
到此,axios 支持了 4 中不同的使用方式,无论哪种使用方式,最后都是执行 Axios 实例上的核心方法:request。
请求 / 响应拦截器是如何生效的?
设置拦截器
对于大多数 spa 的项目来说,通常会使用 token 进行用户的身份认证,这就要求每个请求都携带认证信息;接收到服务器信息之后,如果发现用户未登录,需要统一跳转登录页;遇到这种场景,就需要用到 axios 提供的拦截器,以下是拦截器的设置:
// 添加请求拦截器

axios.interceptors.request.use(function (config) {
  config.headers.token = "xxx";

  return config;
});

// 添加响应拦截器

axios.interceptors.response.use(function (response) {
  if (response.code === 401) {
    login();
  }

  return response;
});
源码分析
通过拦截器的使用,可以知道实例 Axios 上添加了interceptors方法,接下来我们看看源码的实现:
// /lib/core/Axios.js
// 每个 Axios 实例上都有 interceptors 属性,该属性上有 request、response 属性,
// 分别都是一个 InterceptorManager 实例,而 InterceptorManager 构造函数就是
// 用来管理拦截器
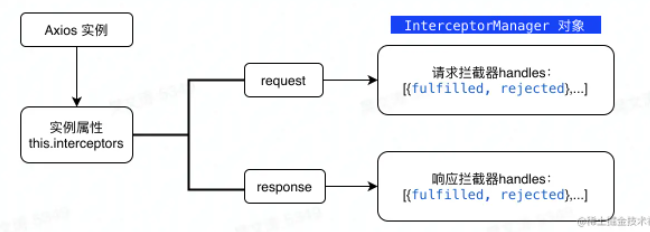
function Axios(instanceConfig) {
this.defaults = instanceConfig;
this.interceptors = {
request: new InterceptorManager(),
response: new InterceptorManager()
};
}
// /lib/core/InterceptorManager.js
function InterceptorManager() {
this.handlers = []; // 拦截器
}
// 往拦截器里 push 拦截方法
InterceptorManager.prototype.use = function use(fulfilled, rejected, options) {
this.handlers.push({
fulfilled: fulfilled,
rejected: rejected,
...
});
// 返回当前索引,用于注销指定拦截器
return this.handlers.length - 1;
};
Axios 与InterceptorManager的关系如图示:
 现在我们已经有了拦截器,那么 axios 是如何保证发起请求的顺序执行呢?
- 请求拦截器 => http 请求 => 响应拦截器
上源码:
// /lib/core/Axios.js

// request 方法中

// 省略部分代码

// 生成请求拦截队列

var requestInterceptorChain = [];

this.interceptors.request.forEach(function unshiftRequestInterceptors(
  interceptor
) {
  requestInterceptorChain.unshift(interceptor.fulfilled, interceptor.rejected);
});

// 生成响应拦截队列

var responseInterceptorChain = [];

this.interceptors.response.forEach(function pushResponseInterceptors(
  interceptor
) {
  responseInterceptorChain.push(interceptor.fulfilled, interceptor.rejected);
});

// 编排整个请求的任务队列

var chain = [dispatchRequest, undefined];

Array.prototype.unshift.apply(chain, requestInterceptorChain);

chain.concat(responseInterceptorChain);

promise = Promise.resolve(config);

// 循环 chain ,不断从 chain 中取出设置的任务,通过 Promise 调用链执行

while (chain.length) {
  promise = promise.then(chain.shift(), chain.shift());
}

return promise;
用图示表示一下拦截器过程更清晰: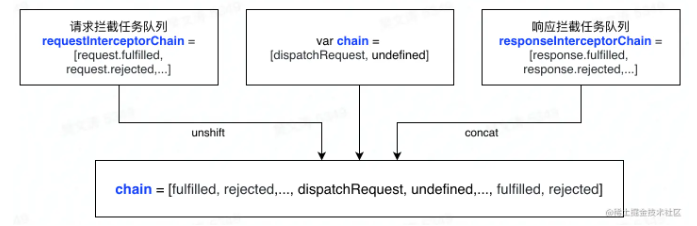 生成任务队列后,再通过
promise.then(chain.shift(), chain.shift())调用 Promise 链去处理设置的任务。这里需要注意一点,请求拦截队列在生成时,是通过Array.unshift(fulfilled, rejected)设置的,也就是说在执行请求拦截时,先设置的拦截方法后执行,后设置的拦截方法先执行。
派发请求 dispatchRequest
源码分析
处理完请求拦截之后,总算开始步入整个请求链路的正轨,也就是上图中任务队列的中间步骤:dispatchRequest派发请求。
// /lib/core/dispatchRequest.js

module.exports = function dispatchRequest(config) {

  // 转换请求数据

  config.data = transformData.call(

    config,

    config.data,

    config.headers,

    config.transformRequest

  );

  ...

  // 适配器 可以自定义适配器,没有自定义,执行axios默认适配器

  var adapter = config.adapter || defaults.adapter;

  // 通过适配器处理 config 配置,返回服务端响应数据 response

  return adapter(config).then(function onAdapterResolution(response) {

    ...

    // 转换响应数据

    response.data = transformData.call(

      config,

      response.data,

      response.headers,

      config.transformResponse

    );

    ...

    return response;

  }, function onAdapterRejection(reason) {

    ...

    return Promise.reject(reason);

  })

}
dispatchRequest中主要做了两件事,先通过transformData对请求数据进行处理,然后定义适配器adapter并执行,通过 .then 方法 对adapter(适配器) resolve 出的响应数据进行处理(transformData)并返回 response,失败返回一个状态为rejected`的 Promise 对象。到此也就明白,当用户调用 axios()时,为什么可以链式调用 Promise 的 .then() 和 .catch() 来处理业务逻辑了。接下来我们从transformData入手,看看 axios 是如何转换请求和响应数据的。
转换请求 / 响应数据
源码分析
// /lib/core/dispatchRequest.js

config.data = transformData.call(
  config,

  config.data,

  config.headers,

  config.transformRequest
);

// /lib/core/transformData.js

module.exports = function transformData(data, headers, fns) {
  utils.forEach(fns, function transform(fn) {
    data = fn(data, headers);
  });

  return data;
};
通过上述代码可以发现transformData方法主要是遍历config.transformRequest数组中的方法,config.data和config.headers作为参数。来看一下transformRequest和tranformResponse的定义:
// /lib/default.js

var default = {

  ...

  // 转换请求数据

  transformRequest: [function transformRequest(data, headers) {

    // 判断 data 类型

    if (utils.isFormData(data) ||

      utils.isArrayBuffer(data) ||

      utils.isBuffer(data) ||

      utils.isStream(data) ||

      utils.isFile(data) ||

      utils.isBlob(data)

    ) {

      return data;

    }

    if (utils.isArrayBufferView(data)) {

      return data.buffer;

    }

    if (utils.isURLSearchParams(data)) {

      setContentTypeIfUnset(headers, 'application/x-www-form-urlencoded;charset=utf-8');

      return data.toString();

    }

    // 如果 data 是对象,或 Content-Type 设置为 application/json

    if (utils.isObject(data) || (headers && headers['Content-Type'] === 'application/json')) {

      // 设置 Content-Type 为 application/json

      setContentTypeIfUnset(headers, 'application/json');

      // 将 data 转换为 json 字符串返回

      return JSON.stringify(data);

    }

    return data;

  }],

  // 转换响应数据

  transformResponse: [function transformResponse(data) {

    ...

    if (strictJSONParsing || (forcedJSONParsing && utils.isString(data) && data.length)) {

      try {

        // 将 data 转换为 json 对象并返回

        return JSON.parse(data);

      } catch (e) {

        ...

      }

    }

    return data;

  }],

  ...

}
到此,请求数据和响应数据的转换过程已经结束了,顺便提一下,官方文档介绍的特性之一:**自动转换 JSON 数据,**应该就是转换过程中的JSON.stringify(data)与JSON.parse(data)了;
重写 / 新增转换方法
发现transformRequest方法是default对象上的一个属性,那么我们是不是可以通过自定义配置来改写转换的过程呢?
import axios from 'axios';

// 重写转换请求数据的过程

axios.default.transformRequest = [(data, headers) => {

    ...

    return data

}];

// 增加对请求数据的处理

axios.default.transformRequest.push(

(data, headers) => {

    ...

    return data

});
适配器(adapter)处理请求
dispatchRequest方法做的第二件事:定义adapter,并执行。接下来,我们来揭开adapter的面纱,看看它具体是怎么处理 HTTP 请求的~
源码分析
下面的代码可以看出,适配器是可以自定义的,如果没有自定义,则执行 axios 提供的默认适配器。
// /lib/core/dispatchRequest.js (51行)

var adapter = config.adapter || defaults.adapter;
我们先来分析默认适配器,在default.js中:
function getDefaultAdapter() {

    var adapter;

    // 判断当前环境

    if (typeof XMLHttpRequest !== 'undefined') {

    // 浏览器环境,使用 xhr 请求

    adapter = require('./adapters/xhr');

    } else if (typeof process !== 'undefined' && Object.prototype.toString.call(process) === '[object process]') {

    // node 环境,使用 http 模块

    adapter = require('./adapters/http');

    }

    return adapter;

}

var defaults = {

    ...

    // 定义 adapter 属性

    adapter: getDefaultAdapter(),

    ...

}
可以看到,axios 之所以支持浏览器环境和 node 环境,就是getDefaultAdapter方法进行了环境判断,分别使用xhr 处理浏览器请求和**http 模块处理 node 请求。**官方称之为isomorphic(同构)能力。这里定义了defaults对象,该对象定义了 axios 的一系列默认配置,还记得它是在哪被注入到 axios 中的吗?当然是在入口文件axios.js里了。
// /lib/axios.js

...

var defaults = require('./defaults');

...

function createInstance(defaultConfig) {

  ...

  // 创建 axios 实例

  var context = new Axios(defaultConfig);

  ...

}

var axios = createInstance(defaults);

...
哎呦,串起来了有没有~好的,重新说回到 xhr 请求,本文只分析浏览器环境中 axios 的运行机制,因此接下来,让我们打开./adapters/xhr文件来看一下:
module.exports = function xhrAdapter(config) {

  return new Promise(function dispatchXhrRequest(resolve, reject) {

    ...

    var request = new XMLHttpRequest();

    // 设置完整请求路径

    var fullPath = buildFullPath(config.baseURL, config.url);

    request.open(config.method.toUpperCase(), buildURL(fullPath, config.params, config.paramsSerializer), true) ;

    // 请求超时

    request.timeout = config.timeout;

    request.ontimeout = function handleTimeout() {...}

    // 请求中断

    request.onabort = function handleAbort() {...}

    ...

    request.send(requestData);

  }

}
将 config 中的请求配置进行赋值处理,正式发起XMLHttpRequest****请求。
自定义 adapter
通过上面对 adapter 的分析,可以发现如果自定义 adapter 的话,是可以接管 axios 的请求和响应数据的,因此可以自定义 adapter 实现 mock;
const mockUrl = {
  "/mock": { data: xxx },
};

const instance = Axios.create({
  adapter: (config) => {
    if (!mockUrl[config.url]) {
      // 调用默认的适配器处理需要删除自定义适配器,否则会死循环

      delete config.adapter;

      return Axios(config);
    }

    return new Promise((resolve, reject) => {
      resolve({
        data: mockUrl[config.url],

        status: 200,
      });
    });
  },
});
ts 封装 axios
请求拦截 可以携带 token 可以配置超时时间 可以控制 loading 效果
响应拦截 可以指定特殊的状态码 可以对数据进行预处理
对响应拦截可以输出一些提示信息 便于调试
//index.ts
import axios from "axios";
import type { AxiosInstance, AxiosRequestConfig } from "axios";
class Request {
  //axios实例
  instance: AxiosInstance;
  constructor(config: AxiosRequestConfig) {
    this.instance = axios.create(config);
  }
  request(config: AxiosRequestConfig) {
    this.instance.request(config);
  }
}
export default Request;
其封装为一个类,而不是一个函数的原因是因为类可以创建多个实例,适用范围更广,封装性更强一些
创建一个对象 然后可以指定 baseURl Timeout 拦截器{}对象方法·
封装一个接口 指定拦截器 request 拦截器 类型是 axiosrequestconfig 类型
catch 拦截器 响应拦截 响应错误拦截
继承类型 axiosrequestconfig 然后可以设置不同的拦截器
别人传进来什么样的拦截 就可以应用什么样的拦截
不仅可以传入基本属性还可以传入拦截器
针对每个拦截器可以做自己的东西 比如输出不同的东西 进行不同的代码提示
在开发的时候控制台输出很多,自定义拦截器之后 可以对不同接口进行不同代码提示
针对不同的方法可以设置不同的拦截器 request get post delete patch 等等
请求很多 请求之前做的东西不一样的 每个请求不一样 所有请求都有的处理 所有都共有 没有的再加
比如返回的时候就拿到 res.data 自己可以预先处理得到的数据 比如可以设置是否显示加载 也可以拿到其他的比如状态码
import type { AxiosRequestConfig, AxiosResponse } from 'axios'
//interface指定一个类型传入 也可以设置默认类型
export interface HYRequestInterceptors<T = AxiosResponse> {
  requestInterceptor?: (config: AxiosRequestConfig) => AxiosRequestConfig
  requestInterceptorCatch?: (error: any) => any
  responseInterceptor?: (res: T) => T
  responseInterceptorCatch?: (error: any) => any
}

export interface HYRequestConfig<T = AxiosResponse> extends AxiosRequestConfig {
  interceptors?: HYRequestInterceptors<T>
  showLoading?: boolean
}
导入配置
import axios from "axios";
import type { AxiosInstance } from "axios";
import type { HYRequestInterceptors, HYRequestConfig } from "./type";

import { ElLoading } from "element-plus";
import { ILoadingInstance } from "element-plus/lib/el-loading/src/loading.type";

const DEAFULT_LOADING = true;
Request 类
class HYRequest {
  instance: AxiosInstance
  interceptors?: HYRequestInterceptors
  showLoading: boolean
  loading?: ILoadingInstance

  constructor(config: HYRequestConfig) {
    // 创建axios实例
    this.instance = axios.create(config)

    // 保存基本信息
    this.showLoading = config.showLoading ?? DEAFULT_LOADING
    this.interceptors = config.interceptors

    // 使用拦截器
    // 1.从config中取出的拦截器是对应的实例的拦截器
    this.instance.interceptors.request.use(
      this.interceptors?.requestInterceptor,
      this.interceptors?.requestInterceptorCatch
    )
    this.instance.interceptors.response.use(
      this.interceptors?.responseInterceptor,
      this.interceptors?.responseInterceptorCatch
    )

    // 2.添加所有的实例都有的拦截器
    this.instance.interceptors.request.use(
      (config) => {
        console.log('所有的实例都有的拦截器: 请求成功拦截')

        if (this.showLoading) {
          this.loading = ElLoading.service({
            lock: true,
            text: '正在请求数据....',
            background: 'rgba(0, 0, 0, 0.5)'
          })
        }
        return config
      },
      (err) => {
        console.log('所有的实例都有的拦截器: 请求失败拦截')
        return err
      }
    )

    this.instance.interceptors.response.use(
      (res) => {
        console.log('所有的实例都有的拦截器: 响应成功拦截')

        // 将loading移除
        this.loading?.close()

        const data = res.data
        if (data.returnCode === '-1001') {
          console.log('请求失败~, 错误信息')
        } else {
          return data
        }
      },
      (err) => {
        console.log('所有的实例都有的拦截器: 响应失败拦截')
        // 将loading移除
        this.loading?.close()

        // 例子: 判断不同的HttpErrorCode显示不同的错误信息
        if (err.response.status === 404) {
          console.log('404的错误~')
        }
        return err
      }
    )
  }
 request<T>(config: HYRequestConfig<T>): Promise<T> {
    return new Promise((resolve, reject) => {
      // 1.单个请求对请求config的处理
      if (config.interceptors?.requestInterceptor) {
        config = config.interceptors.requestInterceptor(config)
      }

      // 2.判断是否需要显示loading
      if (config.showLoading === false) {
        this.showLoading = config.showLoading
      }

      this.instance  //指定T 需要外部传入 再到intercepter 再到res
        .request<any, T>(config)
        .then((res) => {
          // 1.单个请求对数据的处理
          if (config.interceptors?.responseInterceptor) {
            res = config.interceptors.responseInterceptor(res)
          }
          // 2.将showLoading设置true, 这样不会影响下一个请求
          this.showLoading = DEAFULT_LOADING

          // 3.将结果resolve返回出去
          resolve(res)
        })
        .catch((err) => {
          // 将showLoading设置true, 这样不会影响下一个请求
          this.showLoading = DEAFULT_LOADING
          reject(err)
          return err
        })
    })
  }
 get<T>(config: HYRequestConfig<T>): Promise<T> {
    return this.request<T>({ ...config, method: 'GET' })
  }

  post<T>(config: HYRequestConfig<T>): Promise<T> {
    return this.request<T>({ ...config, method: 'POST' })
  }

  delete<T>(config: HYRequestConfig<T>): Promise<T> {
    return this.request<T>({ ...config, method: 'DELETE' })
  }

  patch<T>(config: HYRequestConfig<T>): Promise<T> {
    return this.request<T>({ ...config, method: 'PATCH' })
  }
}

export default HYRequest
index.ts 做统一出口 新建一个对象 然后设置 url time interceptors
// service统一出口
import HYRequest from "./request";
import { BASE_URL, TIME_OUT } from "./request/config";

//在新建的时候传入配置 相当于config
const hyRequest = new HYRequest({
  baseURL: BASE_URL,
  timeout: TIME_OUT,
  interceptors: {
    requestInterceptor: (config) => {
      // 携带token的拦截
      const token = "";
      if (token) {
        config.headers.Authorization = `Bearer ${token}`;
      }

      console.log("请求成功的拦截");
      return config;
    },
    requestInterceptorCatch: (err) => {
      console.log("请求失败的拦截");
      return err;
    },
    responseInterceptor: (res) => {
      console.log("响应成功的拦截");
      return res;
    },
    responseInterceptorCatch: (err) => {
      console.log("响应失败的拦截");
      return err;
    },
  },
});

export default hyRequest;