基础篇-深入props
一 前言
React 中的 props 想必大家并不陌生。如果从 React 的组件设计思想出发,组件的作用是什么呢?
一方面,它可以作为渲染UI视图的容器。
另一方面,组件之间就像发动机的各个零件,想要让 React 这台机器运作起来,就要处理好各个零件,也就是各个组件之间的联系,而props 担任的角色就是将每个组件联系起来。
props 是 React 组件通信最重要的手段,它在 React 的世界中充当的角色是十分重要的。有一点必须明确,就是通过第二章节的学习,弄清楚一次 render 的过程,就是调用 React.createElement 形成新的 element 过程,新的 element 上就会有新的 props 属性,这个新 props 就是重新渲染视图的关键所在。所以学好 props,有助于打通 React 组件脉络。
本章节将介绍 React 中 props,学好 props 可以使组件间通信更加灵活,同时文中会介绍一些 props 的操作技巧,和学会如何编写嵌套组件。
二 理解props
1 props是什么?
首先应该明确一下什么是 props ,对于在 React 应用中写的子组件,无论是函数组件 FunComponent ,还是类组件 ClassComponent ,父组件绑定在它们标签里的属性/方法,最终会变成 props 传递给它们。但是这也不是绝对的,对于一些特殊的属性,比如说 ref 或者 key ,React 会在底层做一些额外的处理。首先来看一下 React 中 props 可以是些什么东西?
React 中的 props ,还是很灵活的,接下来先来看一个 demo :
/* children 组件 */
function ChidrenComponent(){
    return <div> In this chapter, let's learn about react props ! </div>
}
/* props 接受处理 */
class PropsComponent extends React.Component{
    componentDidMount(){
        console.log(this,'_this')
    }
    render(){
        const {  children , mes , renderName , say ,Component } = this.props
        const renderFunction = children[0]
        const renderComponent = children[1]
        /* 对于子组件,不同的props是怎么被处理 */
        return <div>
            { renderFunction() }
            { mes }
            { renderName() }
            { renderComponent }
            <Component />
            <button onClick={ () => say() } > change content </button>
        </div>
    }
}
/* props 定义绑定 */
class Index extends React.Component{
    state={
        mes: "hello,React"
    }
    node = null
    say= () =>  this.setState({ mes:'let us learn React!' })
    render(){
        return <div>
            <PropsComponent
               mes={this.state.mes}  // ① props 作为一个渲染数据源
               say={ this.say  }     // ② props 作为一个回调函数 callback
               Component={ ChidrenComponent } // ③ props 作为一个组件
               renderName={ ()=><div> my name is alien </div> } // ④ props 作为渲染函数
            >
                { ()=> <div>hello,world</div>  } { /* ⑤render props */ }
                <ChidrenComponent />             { /* ⑥render component */ }
            </PropsComponent>
        </div>
    }
}
效果
如上看一下 props 可以是什么?
- ① props 作为一个子组件渲染数据源。
- ② props 作为一个通知父组件的回调函数。
- ③ props 作为一个单纯的组件传递。
- ④ props 作为渲染函数。
- ⑤ render props , 和④的区别是放在了 children 属性上。
- ⑥ render component 插槽组件。
那么如上 props 在组件实例上是什么样子:
PropsComponent 如果是一个类组件,那么可以直接通过 this.props 访问到它:

在标签内部的属性和方法会直接绑定在 props 对象的属性上,对于组件的插槽会被绑定在 props 的 Children 属性中。
2 React如何定义的props?
接下来一起总结一下 props 究竟能做些什么?
在 React 组件层级 props 充当的角色
一方面父组件 props 可以把数据层传递给子组件去渲染消费。另一方面子组件可以通过 props 中的 callback ,来向父组件传递信息。还有一种可以将视图容器作为 props 进行渲染。
从 React 更新机制中 props 充当的角色
在 React 中,props 在组件更新中充当了重要的角色,在 fiber 调和阶段中,diff 可以说是 React 更新的驱动器,熟悉 vue 的同学都知道 vue 中基于响应式,数据的变化,就会颗粒化到组件层级,通知其更新,但是在 React 中,无法直接检测出数据更新波及到的范围,props 可以作为组件是否更新的重要准则,变化即更新,于是有了 PureComponent ,memo 等性能优化方案。
从React插槽层面props充当的角色 React 可以把组件的闭合标签里的插槽,转化成 Children 属性,一会将详细介绍这个模式。
3 监听props改变
类组件中
① componentWillReceiveProps 可以作为监听props的生命周期,但是 React 已经不推荐使用 componentWillReceiveProps ,未来版本可能会被废弃,因为这个生命周期超越了 React 的可控制的范围内,可能引起多次执行等情况发生。于是出现了这个生命周期的替代方案 getDerivedStateFromProps ,在下一章节,会详细介绍 React 生命周期。
函数组件中
② 函数组件中同理可以用 useEffect 来作为 props 改变后的监听函数。(不过有一点值得注意, useEffect 初始化会默认执行一次)
React.useEffect(()=>{
    // props 中number 改变,执行这个副作用。
    console.log('props改变:' ,props.number  )
},[ props.number ])
4 props children模式
props + children 模式 在 React 中非常常用,尤其对一些优秀开源组件库。比如 react-router 中的 Switch 和 Route , antd 中的 Form 和 FormItem。
首先来看看 prop + children 的几个基本情况。
① props 插槽组件
<Container>
    <Children>
</Container>
上述可以在 Container 组件中,通过 props.children 属性访问到 Children 组件,为 React element 对象。
作用:
- 1 可以根据需要控制 Children 是否渲染。
- 2 像上一节所说的, Container 可以用 React.cloneElement 强化 props (混入新的 props ),或者修改 Children 的子元素。
② render props模式
<Container>
   { (ContainerProps)=> <Children {...ContainerProps}  /> }
</Container>
这种情况,在 Container 中, props.children 属性访问到是函数,并不是 React element 对象,针对这种情况,像下面这种情况下 children 是不能直接渲染的,直接渲染会报错。
function  Container(props) {
     return  props.children
}
如果上述直接这么写,会报如下的错误:
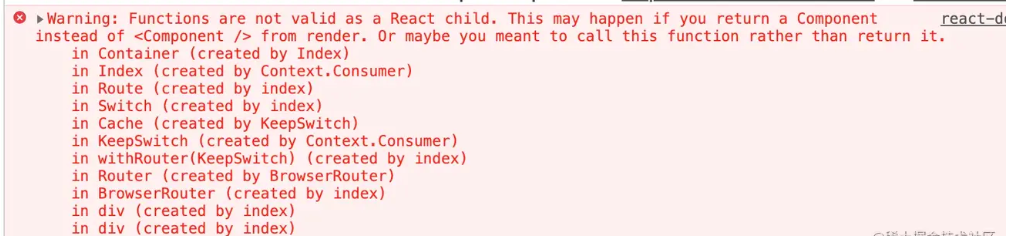
改成如下方式,就可以了。
function  Container(props) {
    const  ContainerProps = {
        name: 'alien',
        mes:'let us learn react'
    }
     return  props.children(ContainerProps)
}
这种方式作用是:
- 1 根据需要控制 Children 渲染与否。
- 2 可以将需要传给 Children 的 props 直接通过函数参数的方式传递给执行函数 children 。
混合模式
如果 Container 的 Children 既有函数也有组件,这种情况应该怎么处理呢?
<Container>
    <Children />
    { (ContainerProps)=> <Children {...ContainerProps} name={'haha'}  />  }
</Container>
首先在 Container 里打印 Children 看看是什么?

const Children = (props)=> (<div>
    <div>hello, my name is {  props.name } </div>
    <div> { props.mes } </div>
</div>)

function  Container(props) {
    const ContainerProps = {
        name: 'alien',
        mes:'let us learn react'
    }
     return props.children.map(item=>{
        if(React.isValidElement(item)){ // 判断是 react elment  混入 props
            return React.cloneElement(item,{ ...ContainerProps },item.props.children)
        }else if(typeof item === 'function'){
            return item(ContainerProps)
        }else return null
     })
}

const Index = ()=>{
    return <Container>
        <Children />
        { (ContainerProps)=> <Children {...ContainerProps} name={'haha'}  />  }
    </Container>
}
效果
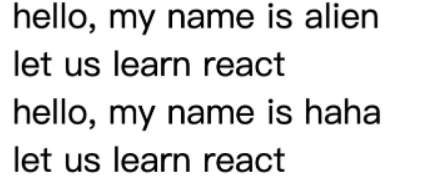
这种情况需要先遍历 children ,判断 children 元素类型:
- 针对 element 节点,通过 cloneElement 混入 props ;
- 针对函数,直接传递参数,执行函数。
5 操作 props 小技巧
抽象 props
抽象 props 一般用于跨层级传递 props ,一般不需要具体指出 props 中某个属性,而是将 props 直接传入或者是抽离到子组件中。
混入 props
function Son(props){
    console.log(props)
    return <div> hello,world </div>
}
function Father(props){
    const fatherProps={
        mes:'let us learn React !'
    }
    return <Son {...props} { ...fatherProps }  />
}
function Index(){
    const indexProps = {
        name:'alien',
        age:'28',
    }
    return <Father { ...indexProps }  />
}
打印
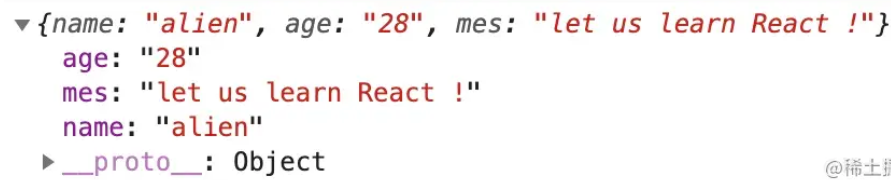
Father 组件一方面直接将 Index 组件 indexProps 抽象传递给 Son,一方面混入 fatherProps 。
抽离props
有的时候想要做的恰恰和上面相反,比如想要从父组件 props 中抽离某个属性,再传递给子组件,那么应该怎么做呢?
function Son(props){
    console.log(props)
    return <div> hello,world </div>
}

function Father(props){
    const { age,...fatherProps  } = props
    return <Son  { ...fatherProps }  />
}
function Index(){
    const indexProps = {
        name:'alien',
        age:'28',
        mes:'let us learn React !'
    }
    return <Father { ...indexProps }  />
}
打印
成功的将 indexProps 中的 age 属性抽离出来。
注入props
显式注入props
显式注入 props ,就是能够直观看见标签中绑定的 props 。
function Son(props){
     console.log(props) // {name: "alien", age: "28"}
     return <div> hello,world </div>
}
function Father(prop){
    return prop.children
}
function Index(){
    return <Father>
        <Son  name="alien"  age="28"  />
    </Father>
}
如上向 Son 组件绑定的 name 和 age 是能直观被看见的。
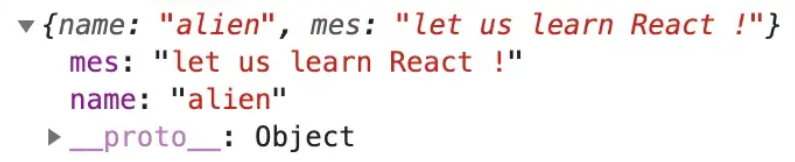
隐式注入 props
这种方式,一般通过 React.cloneElement 对 props.chidren 克隆再混入新的 props 。
function Son(props){
     console.log(props) // {name: "alien", age: "28", mes: "let us learn React !"}
     return <div> hello,world </div>
}
function Father(prop){
    return React.cloneElement(prop.children,{  mes:'let us learn React !' })
}
function Index(){
    return <Father>
        <Son  name="alien"  age="28"  />
    </Father>
}
如上所示,将 mes 属性,隐式混入到了 Son 的 props 中。
三 进阶实践-实现一个简单的 <Form> <FormItem>嵌套组件
接下来到实践环节了。需要编写一个实践 demo ,用于表单状态管理的<Form> 和 <FormItem> 组件
<Form>用于管理表单状态;<FormItem>用于管理<Input>输入框组件。,
编写的组件能够实现的功能是:
- ①
Form组件可以被 ref 获取实例。然后可以调用实例方法submitForm获取表单内容,用于提交表单,resetForm方法用于重置表单。 - ②
Form组件自动过滤掉除了FormItem之外的其他React元素 - ③
FormItem中 name 属性作为表单提交时候的 key ,还有展示的 label 。 - ④
FormItem可以自动收集<Input/>表单的值。
目的:
希望通过这实践 demo 让大家学习到:
- ① props 基本使用
- ② 学会操作 props.children ,隐式注入 props
- ③ 掌握表单嵌套原理(现实情况要比这个复杂)
组件使用
export default  () => {
    const form =  React.useRef(null)
    const submit =()=>{
        /* 表单提交 */
        form.current.submitForm((formValue)=>{
            console.log(formValue)
        })
    }
    const reset = ()=>{
        /* 表单重置 */
        form.current.resetForm()
    }
    return <div className='box' >
        <Form ref={ form } >
            <FormItem name="name" label="我是"  >
                <Input   />
            </FormItem>
            <FormItem name="mes" label="我想对大家说"  >
                <Input   />
            </FormItem>
            <input  placeholder="不需要的input" />
            <Input/>
        </Form>
        <div className="btns" >
            <button className="searchbtn"  onClick={ submit } >提交</button>
            <button className="concellbtn" onClick={ reset } >重置</button>
        </div>
    </div>
}
1 编写 <Form>
class Form extends React.Component{
    state={
        formData:{}
    }
    /* 用于提交表单数据 */
    submitForm=(cb)=>{
        cb({ ...this.state.formData })
    }
    /* 获取重置表单数据 */
    resetForm=()=>{
       const { formData } = this.state
       Object.keys(formData).forEach(item=>{
           formData[item] = ''
       })
       this.setState({
           formData
       })
    }
    /* 设置表单数据层 */
    setValue=(name,value)=>{
        this.setState({
            formData:{
                ...this.state.formData,
                [name]:value
            }
        })
    }
    render(){
        const { children } = this.props
        const renderChildren = []
        React.Children.forEach(children,(child)=>{
            if(child.type.displayName === 'formItem'){
                const { name } = child.props
                /* 克隆`FormItem`节点,混入改变表单单元项的方法 */
                const Children = React.cloneElement(child,{
                    key:name ,                             /* 加入key 提升渲染效果 */
                    handleChange:this.setValue ,           /* 用于改变 value */
                    value:this.state.formData[name] ||  '' /* value 值 */
                },child.props.children)
                renderChildren.push(Children)
            }
        })
        return renderChildren
    }
}
/* 增加组件类型type  */
Form.displayName = 'form'
设计思想:
- 首先考虑到
<Form>在不使用forwardRef前提下,最好是类组件,因为只有类组件才能获取实例。 - 创建一个 state 下的 formData属性,用于收集表单状态。
- 要封装 重置表单,提交表单,改变表单单元项的方法。
- 要过滤掉除了
FormItem元素之外的其他元素,那么怎么样知道它是不是FormItem,这里教大家一种方法,可以给函数组件或者类组件绑定静态属性来证明它的身份,然后在遍历 props.children 的时候就可以在 React element 的 type 属性(类或函数组件本身)上,验证这个身份,在这个 demo 项目,给函数绑定的 displayName 属性,证明组件身份。 - 要克隆
FormItem节点,将改变表单单元项的方法 handleChange 和表单的值 value 混入 props 中。
2 编写 <FormItem>
function FormItem(props){
    const { children , name  , handleChange , value , label  } = props
    const onChange = (value) => {
        /* 通知上一次value 已经改变 */
        handleChange(name,value)
    }
   return <div className='form' >
       <span className="label" >{ label }:</span>
       {
            React.isValidElement(children) && children.type.displayName === 'input'
            ? React.cloneElement(children,{ onChange , value })
            : null
       }
   </div>
}
FormItem.displayName = 'formItem'
设计思想:
FormItem一定要绑定 displayName 属性,用于让<Form>识别<FormItem />- 声明
onChange方法,通过 props 提供给<Input>,作为改变 value 的回调函数。 FormItem过滤掉除了input以外的其他元素。
3 编写 <Input />
/* Input 组件, 负责回传value值 */
function Input({ onChange , value }){
    return  <input className="input"  onChange={ (e)=>( onChange && onChange(e.target.value) ) } value={value}  />
}
/* 给Component 增加标签 */
Input.displayName = 'input'
设计思想:
- 绑定 displayName 标识
input。 inputDOM 元素,绑定 onChange 方法,用于传递 value 。
四 总结
通过本章节,系统学习了 props ,总结一下这节课的内容:
- 系统学习 props ,props是什么,props的作用。
- 操作 props 小技巧。
- 掌握了插槽组件的使用与编写。
- 实践一个 demo ,
<Form> <FormItem>嵌套插槽组件协调管理表单状态。
下一节,将走进 React 的生命周期,去探索生命周期的奥秘。